Here is my friend, the other Liz, modeling her new socks.
Me: Ok, Liz, I finally have your birthday present, sort of. See, I made you these *produce socks* but they came out different sizes, so tell me which one fits better and I'll make another one to match.
Other Liz: They look like they're the same size...
Me: Perfect!
Her husband thought it was terribly silly to take pictures of feet for a knitting blog* so he's the one giving bunny ears.
In other news, the blocking board has blocked a swatch. So far it seems to be working out. So without further ado, here's my tutorial on how to make a cheapass blocking board.
Step 1: go to Hobby Lobby and purchase a Pattern Cutting board. Mine is 36 by 60" and made by Wrights. cost: $6
Step 2: go to Home Depot or similar store and ask about 5 people for help before finding what you needed on your own anyway. Purchase one roll of Clear Laminate adhesive, mine is Duck brand and was also about $6. This is sheets of clear plastic that you can use to laminate kids' projects, maps, things you don't want wet, family pets, etc.
Step 3, Prep: assemble board, laminate roll, at least 2 heavy books, and scissors. Unfold board.

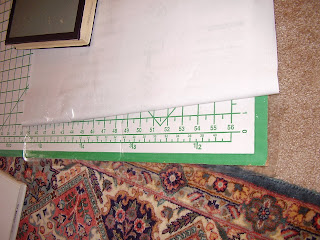
Step 4: Cut a strip of laminate that will go across the board the short way, plus about 2". Lay laminate down across the far right edge and use books to keep it from rolling up on itself.
Step 5: Peel back paper from laminate and fold the paper under, while carefully sticking the sticky sticky laminate to the board. Leave an inch or so hanging over the sides. Secure with book, I used Barrington Moore's Origins of Dictatorship and Democracy. Very useful and heavy.

(nice carpet, huh?)
Step 6: Press on laminate and smooth it out. Now pull the paper backing away and under Moore's book, pressing and smoothing as you go. Try to avoid wrinkles, but it's not that big a deal if some get in there. At least I hope not, because mine has several.
Step 7: Once you've pulled all the paper backing off, smooth it over with your hands again and then fold the edges of the laminate down, cutting off excess at the corners.
Step 8: Repeat as necessary to cover the board. Make sure that each sheet overlaps the one before it just a bit. I wound up needing three full sheets and a bit of change.
Step 9: Clean up trash and admire shiny new blocking board.

Because this is made with plastic that doesn't breathe well, I imagine it would be important not to put down any soaking wet knitted items for blocking, so don't forget to squeeze out excess moisture.
*I think he finds the knitting thing in general to be pretty silly, but that's muggles for ya.
Very impressive. I may have to send hubby to Home Depot for some of that stuff!
ReplyDeleteI'm glad your friend Liz loves the socks as they are...she looks happy.
What's funny about taking pics for a knitting blog? lol Some people just haven't been enlightened yet.
I can't believe you made your own blocking board. It is awesome!
ReplyDeleteSo glad your friend fit both socks too. They look great.
Thanks for the heads up about grad school, I'm kind of intimidating. Also, cute socks.
ReplyDeleteVery ingenious! And ain't that the truth about Home Depot?
ReplyDeleteI have been anxiously awaiting the instructions for the blocking board. It is everything I hoped it would be (cheap, easy), and more (nice looking, and really, really easy)! The socks are cute, too.
ReplyDeleteMan, I knew all kinds of people related to this post!
ReplyDeleteGreat idea for the blocking board!
ReplyDelete(socks kind of self block as they are worn anyway - I'm sure the socks are fine) They certainly look good!
I'm definitely going to have to save this for future reference. thanks! glad Liz loves the socks too. :)
ReplyDelete